|
Gardens Ablaze |
||
|
|
Creating a waterfall
|
|
|
Related Topics Building a Backyard Pond - Where to Start
Site Map
Home
|
 Every
back yard pond needs a to have a means of filtration and water circulation, and
a waterfall is an aesthetic way to accomplish this fairly easily and
inexpensively. Basically, all you need is a mound of soil, some rock or
whatever you plan to use to create the waterfall, a piece of pond liner to
underlay your materials, and a pump with tubing. Obviously, you will need
a source of electricity nearby too, which MUST be a GFCI setup so you don't
shock yourself to death out there - so don't skimp on that. Every
back yard pond needs a to have a means of filtration and water circulation, and
a waterfall is an aesthetic way to accomplish this fairly easily and
inexpensively. Basically, all you need is a mound of soil, some rock or
whatever you plan to use to create the waterfall, a piece of pond liner to
underlay your materials, and a pump with tubing. Obviously, you will need
a source of electricity nearby too, which MUST be a GFCI setup so you don't
shock yourself to death out there - so don't skimp on that.
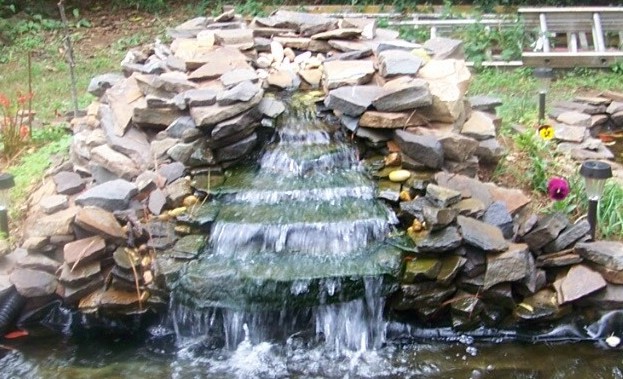
The photos here are the second incarnation for this particular pond and waterfall because I did it all wrong the first time. I erroneously thought that I had to make all the water go down the flat rocks or spillway, so I spent a lot of time and effort trying to make that happen. The result was that I had a waterfall that leaked from day one that I couldn't use unless I was out there monitoring it. I ended up buying a second pump as a bubbler to move the water and filter it, only using the waterfall when company came along. This time around, I'm pleased to say that the waterfall is working perfectly, with essentially zero water loss other than maybe a quarter inch a week from evaporation, wind, wildlife, etc. If you look at natural waterfalls, you
will notice that although most of the water goes down the middle where the
spillway is, some escapes and finds pathways down each side. As you can
see in these pictures, the smaller rocks on both sides are wet, and there is
water escaping behind and between these. But it's all going back into the
pond because I have a wide piece of pond liner underneath that is folded on each
side and then hidden by rock to contain all the water that escapes, funneling it
right back into the pond. I wish I had taken
Because of the design, I didn't feel the need with this waterfall to buy any kind of foam to seal cracks. Water escapes behind the spillway rocks and between all the other rocks, but it's all ending up back in the pond and my pump is powerful enough that I have good flow down the spillway. However, if you have a compelling reason to use it, the foam works well and ages quickly to a natural look. One more thing - when you lay the liner for the waterfall, don't leave it hanging down into the pond. For one thing it shows and looks awful. For another, it may wick water up and behind it, so cut it off just above the water line but below the edge of the pond liner itself. So that's it, folks. The most expensive part of this waterfall project (other than the liner) was the pump, which wasn't cheap at about $170.00. I bought 20 feet of flexible tubing, which was around $20.00, and found all of it easily in the big box home store. The pump came with a mesh bag that catches debris, which is a really cool thing. In fact, that and the pond rock at the top of the spillway is all I'm using for filtration right now, and the water has been crystal clear except in the hottest part of the summer when I had to use an algaecide one time to clear it. All I have to do is periodically pull the pump out and hose off the mesh bag when it looks like it is getting dirty, and I'm good for another month or two. Gotta love it!
Custom Search
|
|
|
Gardens Ablaze |
||
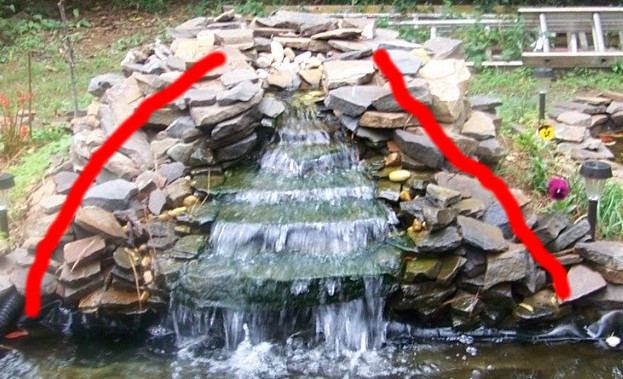 pictures while building this waterfall (which took maybe 3 hours), but I didn't
- so I have included a picture showing about where the liner is folded up under
the rock to create this funnel-type situation. I don't see a real need to
design the waterfall beforehand, but you absolutely need to have the pump in
place and working as you build it, or you will be disappointed at the results
because the water never flows like you expect it to. Mine wasn't big
enough to have to stand in the water and build it, but if your rocks are very
heavy or you are building a big waterfall, you might have to get wet.
pictures while building this waterfall (which took maybe 3 hours), but I didn't
- so I have included a picture showing about where the liner is folded up under
the rock to create this funnel-type situation. I don't see a real need to
design the waterfall beforehand, but you absolutely need to have the pump in
place and working as you build it, or you will be disappointed at the results
because the water never flows like you expect it to. Mine wasn't big
enough to have to stand in the water and build it, but if your rocks are very
heavy or you are building a big waterfall, you might have to get wet.
 As
far as the water source at the top, I have found that it's best to make a little
mini-pond up there that fills up and then releases the water down the spillway.
To the left is a photo illustrating this. I bought some pond rock from the
big box store and put it in there for a little added filtration.
This is optional and will have to be replaced periodically, especially during
the summer months, but that's a task that takes maybe 30 minutes so it's doable.
As you can see from this picture, I am dealing with some string algae on the
spillway itself, which is a fairly common thing with waterfalls, and it is a
clue that I need to replace the pond rock soon because it is catching debris and
feeding the algae. So it's a trade-off. In my opinion, anything that
catches debris is a good thing, even though it might cause me to have to get off
my duff once in a while to maintain it. The algae itself is a rather
pretty green color, but it severely muffles the sound of the water and I
definitely don't want it escaping into the pond. I use one of those
plastic mesh dishwashing things to scrub it off periodically if it gets too bad,
taking care not to let too much fall into the pond as I do it.
As
far as the water source at the top, I have found that it's best to make a little
mini-pond up there that fills up and then releases the water down the spillway.
To the left is a photo illustrating this. I bought some pond rock from the
big box store and put it in there for a little added filtration.
This is optional and will have to be replaced periodically, especially during
the summer months, but that's a task that takes maybe 30 minutes so it's doable.
As you can see from this picture, I am dealing with some string algae on the
spillway itself, which is a fairly common thing with waterfalls, and it is a
clue that I need to replace the pond rock soon because it is catching debris and
feeding the algae. So it's a trade-off. In my opinion, anything that
catches debris is a good thing, even though it might cause me to have to get off
my duff once in a while to maintain it. The algae itself is a rather
pretty green color, but it severely muffles the sound of the water and I
definitely don't want it escaping into the pond. I use one of those
plastic mesh dishwashing things to scrub it off periodically if it gets too bad,
taking care not to let too much fall into the pond as I do it.