|
Gardens Ablaze |
||
|
|
Installing & Maintaining a New Perennial Bed
|
|
|
Related Topics Effective use of Color in the Landscape Home Landscaping Ideas Introduction Site Map
Home
|
 If
you have have done any gardening at all, you have no doubt at least considered
creating a perennial bed somewhere on your property. So why
do we see so few well-done perennial beds around the neighborhood?
Fear of failure is the most likely cause. Or fear of the expense or
maintenance involved. Or maybe all of the above. All valid to
some extent too, unless you use a little creativity to cut costs and insure
success, which is precisely what this website site is all about. If
you have have done any gardening at all, you have no doubt at least considered
creating a perennial bed somewhere on your property. So why
do we see so few well-done perennial beds around the neighborhood?
Fear of failure is the most likely cause. Or fear of the expense or
maintenance involved. Or maybe all of the above. All valid to
some extent too, unless you use a little creativity to cut costs and insure
success, which is precisely what this website site is all about.
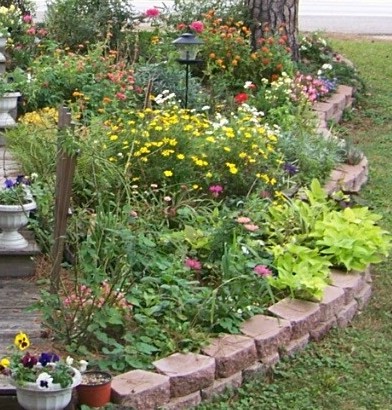
I considered several ways of writing this section and decided that the best way to present this material would be to combine common sense tactics with my own experience creating the perennial bed in progress pictured above, which performed admirably in this, its first year, despite hot drought conditions throughout most of the summer. A few quick pointers on flower gardens in general are in order at this point, before getting into the nuts and bolts of how to do your first perennial garden. First, is that the term "perennial garden" doesn't mean that the only plants that can go in this space must be true "perennials." In fact, they don't even have to be flowers. Especially in the first few years, you can and should use annuals and even vegetables to fill in bare spaces and add color, and there's nothing wrong adding annuals year after year if you stumble upon some that you especially like. Second, the area you choose in which to place your perennial garden should get at least 6 hours of full sun every day. Yes there are perennials that do well in shade or part shade, but there are definitely a lot more that do well in full sun and you don't want to limit your choices too much in the beginning. Third, and this one is more important than anything else, start with a good layer of organic mulch! In fact, most of your budget for your new perennial bed should be spent on mulch. If you try to grow a beautiful perennial bed without mulch, you are setting yourself up for hours of needless weeding and expensive watering, and quite frankly, the plants will still suffer despite all your efforts. Additionally, if you don't own a lot of yard equipment and are not willing to double dig a large area, you can cover the area for your new bed with a heavy mulch without ever putting a spade or tiller tine in the ground. It's best if you try to remove as much grass and weeds from the area as possible, but it's not absolutely mandatory if you cover the area heavily enough with mulch. Mulch is the key to a successful perennial garden!
Choosing new plants is the fun part, but as we all know, planting perennials is a pretty expensive endeavor at up to 15 bucks a plant. That's where planting seeds, taking cuttings, finding bargain plants, and asking friends for donations comes in. The whole idea with a perennial garden is to create season-long colorful space that renews itself year after year. To accomplish this, you should try to include as many types of plant material you can find that fit the bill. For early spring color, there is nothing that can compete with bulbs, but choose carefully. Tulips and Hyacinths have to be replanted every few years, while Daffodils and Crocus will virtually go on forever, multiplying in number as each season passes. Naturalizing bulbs such as these are always worth the investment and there are choices for every season, such as daylily, iris, gladiolus, and liatris. You will have to grow some plants from seed, especially if you have a big plot. Bear in mind that many perennials grow clumps of foliage in the first year and don't bloom until the second. Don't let that stop you, as your perennial garden is a work in progress that will go on for years. If you haven't done much seeding, don't be intimidated. Save those flats from the impatiens or pansies you do every year and reuse them for planting perennial seeds. If you don't have any old flats around, buy peat pots or inexpensive flats at the dollar store. Buy some good potting soil too. Don't skimp on that or you will have rock hard dried out flats that nothing will sprout in. I have had the best luck with potting soil that has plant food mixed in, such as Scotts or Miracle-Gro. Plant the seeds per packet directions and place somewhere with dappled shade near a water source where you can easily mist the flats to keep them moist. Once the plants have 2-3 sets of true leaves, you have a decision to make. Remember all that mulch you put out there? Planting that little seedling down far enough to get to the soil is out of the question at this point as it will be buried alive. I handled this in two ways in my new bed. Before the real heat of summer came on, I cut strips of newspaper, formed them into a cup that would hold the seedling and root ball, placed a few pellets of 10-10-10 fertilizer on the bottom, stapled the cup together, and planted it into the mulch, firming it down as much as possible. The newspaper holds together long enough for the plant to acclimate and then deteriorates, letting the roots reach out for moisture and nutrients. I didn't lose a single seedling using this method until the real heat set in, made worse by no rain for a couple of months. At that point I changed tactics and started repotting the seedlings into regular pots about the size of a large coffee cup. After a couple of weeks I watered them, waited an hour or so, and then turned the pot over with the soil mostly coming out intact, and planted the whole ball into the mulch. This worked well too and as far as I know I didn't lose any seedlings this way either. However, it was a bit more expensive as far as potting soil, and was more time-consuming than the first way, though I felt it was necessary due to the heat and dry conditions. One thing to remember when planting all these seedlings directly into the mulch is that they will need regular feedings with a balanced fertilizer for the first season until they reach out enough to grab nutrients from the soil, so do throw some slow-release granules out there every month or so. Obviously, another way to get plants to put in your perennial garden is to simply go out and buy them. I am not adverse to this technique at all, and I did my share of buying plants for this garden. I have a section of herbs included, all of which I bought as young plants. I bought two Euryops, which is the yellow daisy-like plant taking up the middle portion of the garden for $3.95 apiece. In my opinion, that plant was the best buy of the season. I bought two butterfly bushes, sweet William, verbenas, heliotrope, salvia, African daisy, Veronica, and wallflower, among other things, all of which were planted right into the mulch and all of which performed beautifully all season. Don't forget about asking your gardening friends to help out when filling your garden space. I had a friend who gave me some wonderful ferns (not sure what type) that stood up to near full sun and drought all summer. She also provided me with cuttings of both the bright green and a purple shade of sweet potato vine that drape over the bricks near the bottom of the bed. Another friend thinned her daylilies and gave me a nice selection of those. My daughter worked in a floral department and brought cuttings of chrysanthemums that rooted easily and are flowering in the picture at the top. Again, for the first few years at least, you will likely need to use some annuals to fill bare spots in your evolving perennial bed. I grew a lot of zinnia seeds this year, and was really impressed by the giant cactus types and the pom poms. I will do both again every year, as they were easy and are striking in the garden. I also used wax begonias, coleus, ageratum, calendula impatiens, pansies, snapdragons, petunias, annual baby's breath, annual phlox, and bachelor's buttons, as well as a few tomato and pepper plants. Perennial seeds I started and that are doing well as winter approaches are Shasta daisies, black-eyed Susans (which bloomed this season), English daisies, yarrow, lupine, dame's rocket, and catmint. As far as bulbs, I added about 50 more daffodils, 40 tulips, 25 freesias, and 25 sparaxis, so it should be a good show starting in early spring next year. As far as maintenance for your new garden, if you have followed these recommendations, there shouldn't be much. Again, do spread some slow-release fertilizer out there about once a month especially in the beginning and when you are establishing new seedlings. Obviously, regular watering should be done during dry conditions, but with adequate mulch and adequate rainfall, it's possible to go for a long time with no supplemental watering. Deadheading is a must, as most perennials will stop producing flowers if you fail to snip off the old blooms, but for me, this is a pleasant job that gives me an opportunity to really look at and enjoy the plants. There's no set schedule for deadheading - just do it as you have time. Weeding is still necessary at times, but again, with enough mulch this will probably consist of just pulling up renegades here and there as you pass by. Most of all, enjoy your new garden and always be willing to try new varieties. Growing by seed offers opportunities to grow plants you would never find at the garden center, so be adventurous. And don't forget about cutting a few of those gorgeous blooms to brighten up the indoors too!
Custom Search
|
|
|
Gardens Ablaze |
||
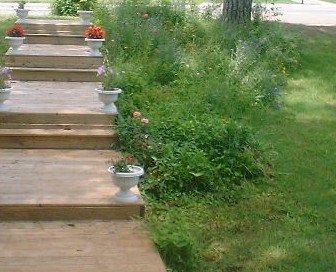 Ok,
now that we have that out of the way, to the right is a picture of my own
yard before I started the garden pictured above. As you can see, this was
basically an overgrown patch of weeds with one lonely rose that wasn't doing
so well in the forefront, and a few tough plants scattered about elsewhere.
I had a big
Ok,
now that we have that out of the way, to the right is a picture of my own
yard before I started the garden pictured above. As you can see, this was
basically an overgrown patch of weeds with one lonely rose that wasn't doing
so well in the forefront, and a few tough plants scattered about elsewhere.
I had a big 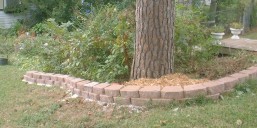 The
next two pictures are shots of the new concrete block border going in.
This was admittedly a fairly expensive project, as these stacking blocks
cost about 3 bucks apiece, but in my case it was necessary. Assuming
you don't have a noxious spreading weed problem like mine, your garden border
can be as elaborate or as simple as you like and can simply consist of spading
a shape out of the lawn and
The
next two pictures are shots of the new concrete block border going in.
This was admittedly a fairly expensive project, as these stacking blocks
cost about 3 bucks apiece, but in my case it was necessary. Assuming
you don't have a noxious spreading weed problem like mine, your garden border
can be as elaborate or as simple as you like and can simply consist of spading
a shape out of the lawn and
 removing
an inch or two of the grass at the border. Rocks, wood, railroad ties,
bricks, etc. are all fair game for bordering your garden, so use some creativity
and hold on to that budget for more mulch! As you can see, I was already
dumping mulch into this area before I was even done setting the blocks or
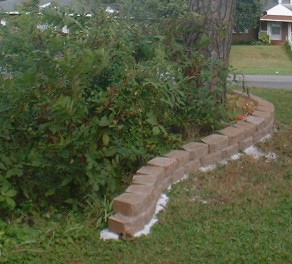
hacking down the weeds. In fact, once the border was done, I spent
an entire winter and early spring hauling in bags of mulch from the garden
center. I estimate that I used about 60 bags at 2 dollars apiece.
At some points in this sloped, uneven garden, the mulch was almost a foot
deep, with the average being about 6 inches. This is an area where
I had previously planted a lot of Daffodils, and when spring came, some
of them had a bit of a hard time pushing through all that mulch, but for
the most part it was still a good springtime show. Incidentally, the white
showing below the bricks is marble chips that I used for leveling and stabilizing
the wall and it has remained in perfect position ever since. Again,
no digging required.
removing
an inch or two of the grass at the border. Rocks, wood, railroad ties,
bricks, etc. are all fair game for bordering your garden, so use some creativity
and hold on to that budget for more mulch! As you can see, I was already
dumping mulch into this area before I was even done setting the blocks or
hacking down the weeds. In fact, once the border was done, I spent
an entire winter and early spring hauling in bags of mulch from the garden
center. I estimate that I used about 60 bags at 2 dollars apiece.
At some points in this sloped, uneven garden, the mulch was almost a foot
deep, with the average being about 6 inches. This is an area where
I had previously planted a lot of Daffodils, and when spring came, some
of them had a bit of a hard time pushing through all that mulch, but for
the most part it was still a good springtime show. Incidentally, the white
showing below the bricks is marble chips that I used for leveling and stabilizing
the wall and it has remained in perfect position ever since. Again,
no digging required. 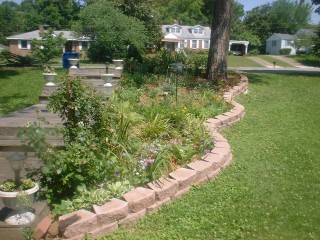 To
the right is a picture in early spring before I got down to choosing
many plants. The daffodils were already spent at this point and the
space is sparsely filled with what little I had that managed to push up
through the mulch and survive, including some liriope, hosta, rose, ferns,
butterfly bushes, plus a few newly planted petunias.
To
the right is a picture in early spring before I got down to choosing
many plants. The daffodils were already spent at this point and the
space is sparsely filled with what little I had that managed to push up
through the mulch and survive, including some liriope, hosta, rose, ferns,
butterfly bushes, plus a few newly planted petunias.